Today, we’re going to learn something cool! We’ll discover how to make your computer pretend to be in a different place on the internet. We can do this by turning your computer into something called a VPN server. This trick lets you hide your real location and be more private when you’re online pretending to be someone else. It’s a bit like playing make-believe, and it’s super fun! Don’t worry; I’ll show you how to do it, whether you have a Windows computer or a Linux one or even Mac. Below I’ve attached a list of other VPN Server/Clients besides what we will be using in this blog.

https://www.softether-download.com/en.aspx?product=softether
Run the installer and follow the installation wizard, accepting the default settings.

Step 3: Configure Server
Open Command Prompt (CMD) and execute ipconfig to get your server's IP address.

In the Server Manager, click on the localhost row and choose “Edit Settings.”

Enter your server’s public IP address in the hostname field. Keep the Port Number as the default (5555). Set a Password and give your settings a name, for example, “xit’s_vpn.” Click OK to proceed.

Now you can observe that the things have been updated.

Set a new password for the Administrator when prompted. So enter any password upon your choice and click OK button. If it’s successfully changed, you will get a prompt saying “The password has been changed.”.

Now. it will display a window asking to enable specific services on the server. For this tutorial, we are learning about cloning the IP address of the server so will need just the Remote Access Server option enabled. Enable it and click on Next button.

Here, it will ask to set a name for your Virtual Hub. You can set any name as per your choice.

You can skip dynamic DNS setup for this tutorial by clicking Exit.

This will provide an option to enable Azure Cloud VPN, but we won’t need that for this tutorial so we will disable and click on OK to proceed.

Provide a name for the client and username, then click “Create Certificate.”

Configure the Certificate details as shown, ensuring it matches your server’s location. Select Save Method to “Save as X509 Certificate (.CER) and Private Key File (.KEY)” & Click OK, and you’ll see that the certificate is assigned to the client. Click OK when prompted that the “Client has been created.”


Save the certificate files with a passphrase.

Once it’s successfully created, click on Exit button.


To connect to the VPN server from another computer, copy the KEY files that you saved during the user creation to the client machine.

On the client PC, download and install the SoftEther VPN Client for Windows.: https://www.softether-download.com/en.aspx?product=softether
Run the client, double click on “Add VPN Connection,” and create a Virtual Network Adapter (VNA).

You can name the VNA as desired (e.g., VPN2 to VPN127).

Now, we can see that a new Virtual Adapter is added on our client manager.
Double-click on “Add VPN Connection” and set up the client’s information, including the server’s Public IP, port 5555, and Client Certificate Authentication. Load the client certificate and key, and enter the password you set during certificate creation.

Right-click and “Connect” to establish the connection.
Now, we are physically connected to the VPN server without any errors.

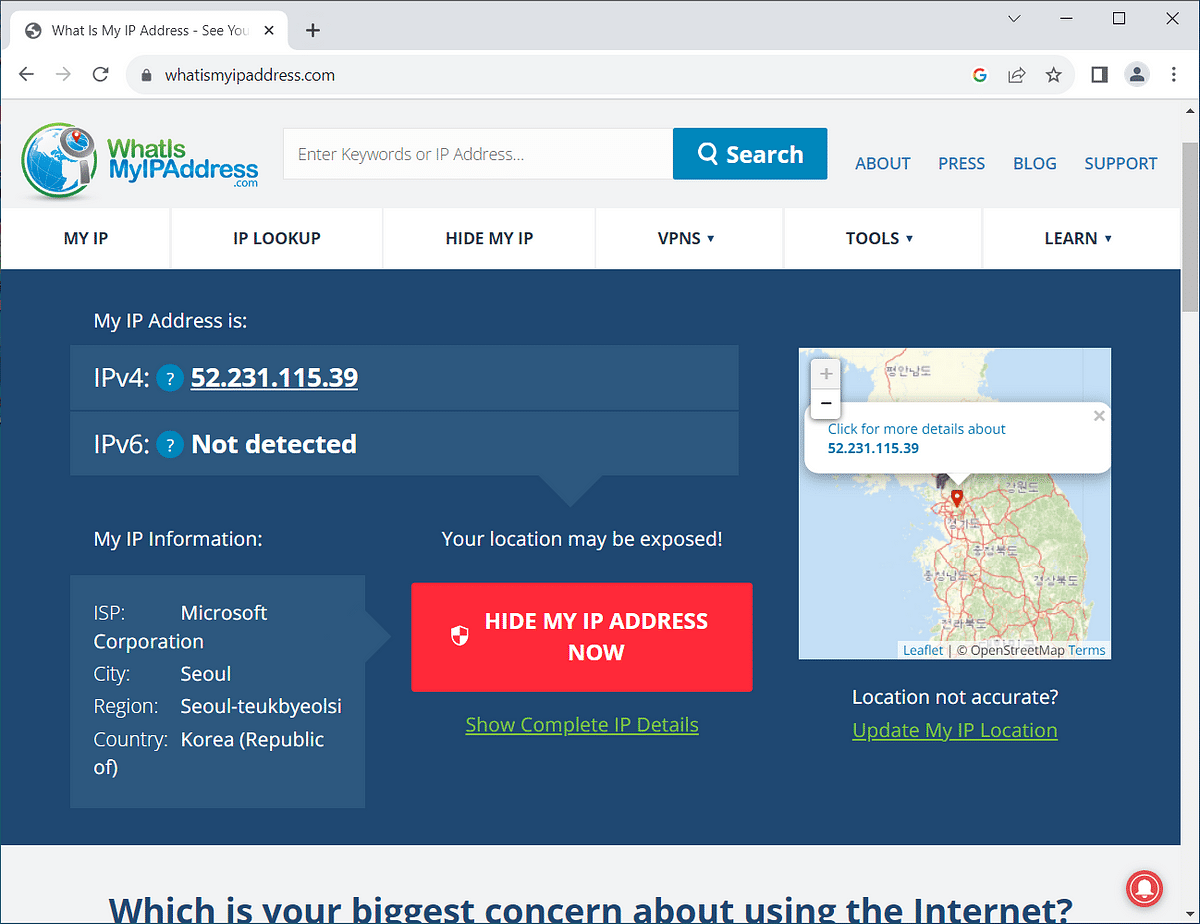
You should now be connected to your SoftEther VPN Server. You can verify the connection by trying to access resources on your local network or browsing the internet through the VPN connection. We can notice that our public IP address is exactly the same as the VPN server address.

Client IP address VS Server IP address
 x-it.medium.com
For Windows:
- Windows Built-in VPN Server (PPTP, L2TP/IPsec, SSTP) (can set this up through the “Incoming Connections” feature in the Network and Sharing Center)
- OpenVPN (it can be configured to run as a server on windows)
- SoftEther VPN Server (free, open-source, and multi-protocol VPN server)
For Linux:
- OpenVPN (highly configurable)
- WireGuard (modern, lightweight, and easy-to-configure VPN server)
- StrongSwan (open-source IPsec-based VPN server)
- OpenConnect Server (ocserv) (open-source SSL VPN server that supports the AnyConnect protocol)
- IKEv2/IPsec (Libreswan) (can configure Linux to work as an IKEv2/IPsec VPN server)
- SoftEther VPN Server (cross-platform)
Note: Windows built-in VPN server is relatively easy to set up but is considered less secure compared to other VPN server solutions. It’s important to understand the security implications before proceeding.
Setting up a VPN server on Windows using the built-in VPN server features can be done using protocols like PPTP, L2TP/IPsec, or SSTP. Make sure you are using a Windows edition that supports incoming VPN connections. Most versions of Windows support this feature, but you may need to upgrade to a specific edition, such as Windows Pro or Enterprise.
I’ll be demonstrating practically using SoftEther VPN software. You’ll need two Windows machines, one for the Server and one for the Client (you can add more clients as needed). I am using the windows machine with below configuration for Server setup:Let’s begin…

Step 1: Download and Install SoftEther VPN Server
Go to the SoftEther VPN website and download the SoftEther VPN Server Manager for Windows.https://www.softether-download.com/en.aspx?product=softether
Run the installer and follow the installation wizard, accepting the default settings.


Step 2: Launch SoftEther VPN Server Manager
After installation, open the SoftEther VPN Server Manager from the Start Menu.Step 3: Configure Server
Open Command Prompt (CMD) and execute ipconfig to get your server's IP address.

In the Server Manager, click on the localhost row and choose “Edit Settings.”

Enter your server’s public IP address in the hostname field. Keep the Port Number as the default (5555). Set a Password and give your settings a name, for example, “xit’s_vpn.” Click OK to proceed.

Now you can observe that the things have been updated.

Step 4: Connect to Server
Now, Select the server and click “Connect.” You’ll be prompted for a password; click OK without entering anything.
Set a new password for the Administrator when prompted. So enter any password upon your choice and click OK button. If it’s successfully changed, you will get a prompt saying “The password has been changed.”.

Now. it will display a window asking to enable specific services on the server. For this tutorial, we are learning about cloning the IP address of the server so will need just the Remote Access Server option enabled. Enable it and click on Next button.

Here, it will ask to set a name for your Virtual Hub. You can set any name as per your choice.

You can skip dynamic DNS setup for this tutorial by clicking Exit.

This will provide an option to enable Azure Cloud VPN, but we won’t need that for this tutorial so we will disable and click on OK to proceed.
Step 5: Set Up User Profile
Click on “Create Users” to set up a user profile for your client.
Provide a name for the client and username, then click “Create Certificate.”

Configure the Certificate details as shown, ensuring it matches your server’s location. Select Save Method to “Save as X509 Certificate (.CER) and Private Key File (.KEY)” & Click OK, and you’ll see that the certificate is assigned to the client. Click OK when prompted that the “Client has been created.”


Save the certificate files with a passphrase.

Once it’s successfully created, click on Exit button.

Step 6: Set Up Local Bridge
Now, Select one of the available NICs on your server computer for the Local Bridge. Click Close.If your server is behind a router, log in to your router’s administration panel and set up port forwarding for UDP ports 500 and 4500 (for IPsec) and UDP port 1701 (for L2TP). Forward these ports to the internal IP address of your VPN server.

Step 7: Set Up Client on Another Computer
Now, our VPN Server setup is done. Now lets setup our Client on other computer.
To connect to the VPN server from another computer, copy the KEY files that you saved during the user creation to the client machine.

On the client PC, download and install the SoftEther VPN Client for Windows.: https://www.softether-download.com/en.aspx?product=softether

Run the client, double click on “Add VPN Connection,” and create a Virtual Network Adapter (VNA).

You can name the VNA as desired (e.g., VPN2 to VPN127).

Now, we can see that a new Virtual Adapter is added on our client manager.

Double-click on “Add VPN Connection” and set up the client’s information, including the server’s Public IP, port 5555, and Client Certificate Authentication. Load the client certificate and key, and enter the password you set during certificate creation.

Right-click and “Connect” to establish the connection.

Now, we are physically connected to the VPN server without any errors.

You should now be connected to your SoftEther VPN Server. You can verify the connection by trying to access resources on your local network or browsing the internet through the VPN connection. We can notice that our public IP address is exactly the same as the VPN server address.

Client IP address VS Server IP address
How to Clone IP Address — Practically Explained..
How to Use the Same IP on Different Devices
x-it.medium.com
If you learnt anything from this blog, we’d appreciate your engagement — give it a clap and consider sharing to help spread the knowledge. Also Follow XIT on medium & UglyCompany on Telegram. Your support means a lot to us!